

Imagine you have a platform that consists of a suite of web applications, all of which may have been developed with the same technology stack. You create a shared npm library to centralize the development of the common components, then you update the components in a single place and publish a new version of the library so that all your applications can use it.Everything looks great until you realize the applications don’t receive the updates automatically, so you have to update the library version in the.json package of all the applications one by one and deploy them to implement the latest changes. If there is a hotfix or a new feature that has to be applied to all the applications, you have to repeat the process.
The problem
Lets visualize the real problem, all our applications share a common theme layout that includes a header with some widgets/components, maybe some shared menus, and a footer for all the applications.This layout can be created easily in a common npm library, but maybe the different widgets are complex components and are being developed by different teams, with all the potential issues that this implies, such as bugs, new features, or contract changes.
The proposed solution – Web components
The idea is to create each widget as a web component that can be deployed independently as a .js file, after which the applications can load and render them in the placeholders created for them in the theme layout.
Implementation
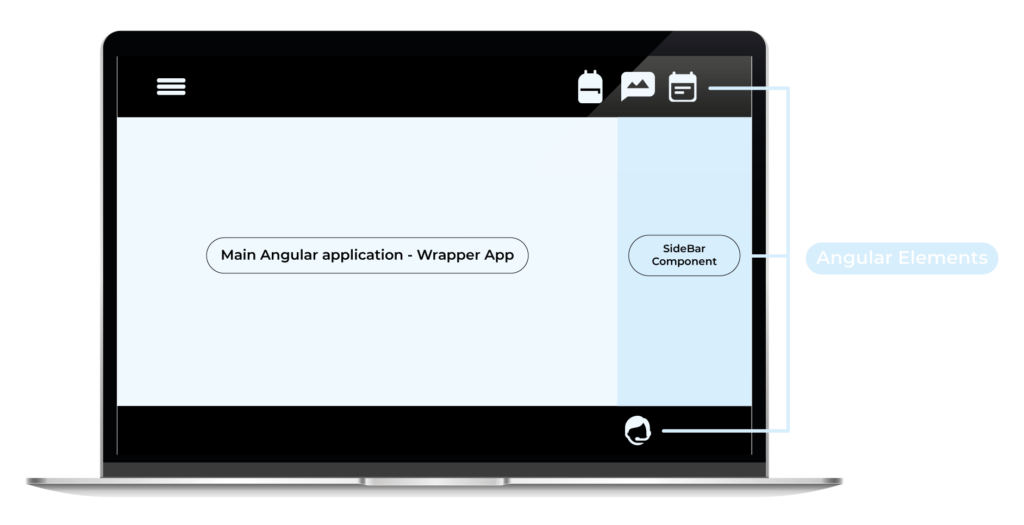
For the implementation I’m going to talk about two applications, first the main angular application which could be one of the applications from my suite, which we’ll call WrapperApp. We need to install some dependencies and consider how to load the web components.Second is the WidgetComponent. I’m going to use some libraries here to customize the usual Angular build with the required considerations.
WrapperApp
- I’m going to use an empty angular app created with Angular-CLI, but this application could have been created using another framework, such as React.JS, Vue, etc, or with a web application with regular javascript.
- The example will be very simple: I’m not using an application with a layout template, but it is easy to see how it works.
- For this example I’m going to set some basic inputs and outputs for the loaded web component. Take into account that if you need to communicate within the web components you probably need to define and interface in a way that ensures the contract between the two applications. Iif not you can include some breaking changes in the web component, in which case you will need to update the main app too.
- One important thing about this approach is that you need to have a strategy for the URLs where the web components are going to be deployed, and maybe define a naming convention for the .js file so you have a way to deploy new versions with breaking changes without breaking all your applications.
Dependencies
- @angular-extensions/elements: this an angular npm library that exposes a directive that will help to load and render the web components. You can create a custom directive, but I recommend this one because it simplifies the development process.
Code
You can follow the official documentation of @angular-extensions/elements which you can see here: https://angular-extensions.github.io/elements/#/home, but here’s a simple example.
- Install npm i @angular-extensions/elements
- Add import { LazyElementsModule } from ‘@angular-extensions/elements’;
- Append LazyElementsModule to the imports: [] of your AppModule
- Add new schemas: [] property with CUSTOM_ELEMENTS_SCHEMA value to the @NgModule decorator of your AppModule
- Use *axLazyElement directive on an element you wish to load and enter the url of the element bundle
@Component({
selector: 'wrapper-app-component',
template: `


`
})
export class WrapperComponent {
elementUrl = 'http://localhost:5001/main.js';

data = {};

handleChange(change) {
console.log(change);
}
}
And that’s it, your widget component will be loaded just like that.
WidgetApp
- I’ll demonstrate using a very simple component, but it can be of any complexity you need, and can have assets or request data from an API, etc.
- URLs: this is very important for production environments and for local environments. Remember that this component will run “inside” the WrapperApp, so be careful when using relative URLs. The best way is probably to use absolute paths.
- BaseClass: A good practice would be to have a WebComponentBaseClass, with the default attributes and events you want from all your web components. Using the previews item you can set a baseUrl here which might be helpful not only in production but also in local environments where developers need to run the WrapperApp and probably one of the WidgetComponents that they are working on. Another example is an instance of some CrossService of your platform, maybe your SecurityService to get the AuthToken you are using to authenticate your API
- Communication with web components is possible via inputs and outputs, but complex logic could be an issue because of the async loading of the web components. It is important to be aware that global services that share data, configurations, etc. will not be available to the component unless developers inject them as inputs.
Dependencies
- @angular/elements: this angular library contains the methods for converting the component into a web component
- ngx-build-plus: Extends the Angular CLI’s default build behavior. In this case it provides the option to build all the project into a single .js file, which is a requirement for implementing a web component
- @webcomponents/webcomponentsjs [OPTIONAL]: this is a polyfill, and won’t be necessary if your target in tsconfig.ts is ES2015.
Code
Angular documentation has a section on the creation of web components. They call them Angular Elements, and you can check it out here: https://angular.io/guide/elements. Following this guide, the AppComponent of our WidgetComponent should look like this
import { BrowserModule } from '@angular/platform-browser';
import { NgModule, Injector } from '@angular/core';
import { createCustomElement } from '@angular/elements';

import { AppComponent } from './app.component';
import { WidgetComponent} from './widget-component/widget-component.component';

@NgModule({
declarations: [
AppComponent,
WidgetComponent
],
imports: [
BrowserModule
],
providers: [],
entryComponents: [
AppComponent,
WidgetComponent
]
})
export class AppModule {
constructor(private injector: Injector) { }
ngDoBootstrap(): void {
const { injector } = this;
const ngCustomElement = createCustomElement(WidgetComponent, { injector });
customElements.define('widget-component', ngCustomElement);

}
}
It is important to note first of all that the NgModule definition doesn’t have a Bootstrap component, and secondly, that in the ngDoBootstrap method the “widget-component” tag name that you choose must be the same as the one that you are going to use in the wrapper app with the axLazyElement directive.
Configuration
In the Angular.json, replace the default builder with ngx-build- plus:
"architect": {
"build": {
"builder": "ngx-build-plus:build", ....
"serve": {
"builder": "ngx-build-plus:dev-server",
...
"test": {
"builder": "ngx-build-plus:karma",
...
You can define two custom scripts in your.json package file
"start": "npm run build && serve -l 5001 dist/micro-fe-ng",
"build": "ng build --prod --output-hashing none --single-bundle true",
The first one will be useful during development, and the second will probably be needed to build the component. Your continuous deployment tool may use it, and it ensures that the resulting build is in a single file and that the name is fixed, so you can always load the same file name.
Final Thoughts
- Here we have only talked specifically about Angular, but we could use a variety of technologies in a single application.
- Read the considerations section of each application where I have shared the experiences I have had using this solution.
- Remember that each web component has to be implemented as an individual Angular application, so if you need a library of visual components it might be better to develop them as an Angular Library and share them as npm modules.
- The build process for the application is slightly different to normal Angular projects, so you should take this into account when configuring your automated process.
- A consensus on the way to deploy the web components is needed: one option could be to deploy them as {environment}/{webcomponentname}/main.js.
- It may be necessary to think about a version naming convention fo the files. As with other js files, older versions of the web components could include their versions in the file names, with the latest one always using the same name.

About the Author
Emiliano Daza is a Full Stack developer specialized in JavaScript, with 8 years of experience in software development. Emiliano shows good effort and team collaboration and always delivers high-quality results. He has excellent communication skills.